Godot 4 is a game engine that is known for its innovative features. It offers game creators a platform to create interactive and engaging games. The engine has made it possible to integrate external data sources into virtual worlds, which adds a layer of realism to the gaming experience. In this article, we delve into the details of how to fetch data from an API within the Godot Game Engine. Join us as we explore the relationship between code and creativity, and take your first steps into the endless possibilities that lie in the digital domain.
What is an API?
An API, or Application Programming Interface, serves as a bridge between different software applications, allowing them to communicate and interact with each other. APIs provide a standardized way for developers to access specific functionalities or data from a service or platform without needing to understand its internal workings. Utilizing these APIs allows you to take your game development skills to another level. A few small examples of this are :
- Sending and retrieving multiplayer profile data in an external database
- Dynamically serving assets from an external server instead of the game files
- Utilizing AI chat and art in your game dynamically
Creating our Scene
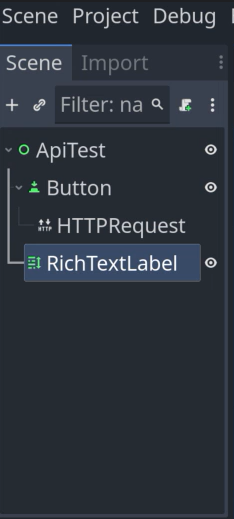
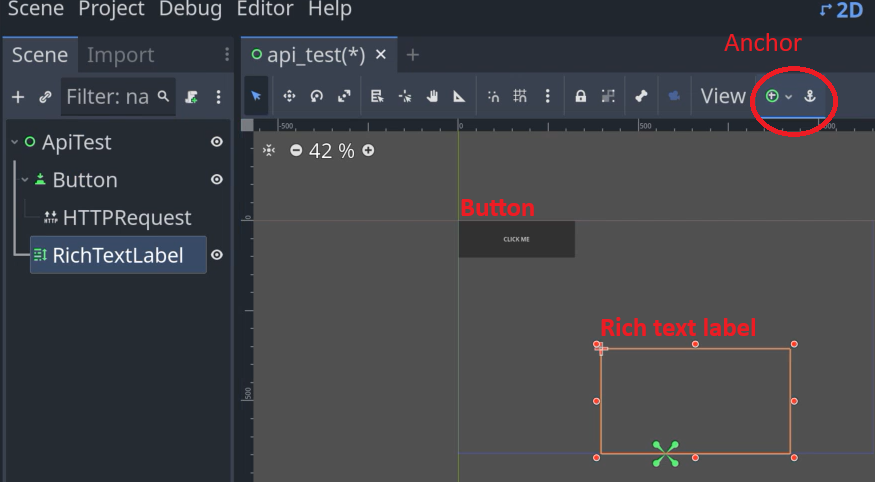
For this project, we will be using one scene that consists of 4 nodes. Starting, create a new scene, and select the “Control” node for the root. After creating the scene, rename the control node and save your scene. For example, I will be naming my node “ApiTest” and my scene “api_test.tscn”. Next, we can add a “Button” node and a “RichTextLabel” node as children of the main root control node. Also, add a “HTTPRequest” node as a child of your newly created button node. Your scene should look like this :
Next, select the button from the scene tree on the left (see Image above), and on the right side, inside of the inspector, change the “Text” property to something relevant. I will simply be typing “CLICK ME” here. We can now adjust the position and size of both the button and the rich text label. This can be done by selecting them each individually from the scene tree on the left and using the drag interface to make them larger. For perfect positioning, you can use the anchor attribute which will align it to the desired spot on the page. The button here is anchored to the top right of the scene.
Configuring the button
We want to be able to fire our HTTP request each time the button is clicked. Thus, we need to know when that event happens before we can make our request. Godot makes this very easy with the use of signals. Before we can set up a signal, we need a GDscript file. Select your main root control node and add a GDscript file to it by clicking the script symbol. Once this file is created, select the button from your scene tree on the left-hand side. Then, select the “Node” option on the far right. You will see that there is an option under the “BaseButton” signals called “pressed()”. Double-click on this option.

Upon double-clicking this option, a pop-up window should appear. Make sure your main root node (where the script lives) is selected and click connect. After which you will see a new function appear. This function is likely called “_on_button_pressed()”. To test whether our button is working, replace the “pass” statement with a simple print statement. Your function should look something like this:
func _on_button_pressed():
	print('test')
Now, you can test this code by pressing F6. Once inside your new game window, click the button. You should see your desired print statement is shown in the output section at the bottom of the game engine.
Making the HTTP request
We can now make our HTTP request. At the top of the file, directly under where it says “extends Control” but above our first function, we are going to create several variables. We are going to create two onready node variables—one for our button, and one for our rich text label. We will also create a variable for the URL that we will be using for the httprequest. In this example, I will be using a simple free API that returns a random cat fact upon a get request. The code should look something like this:
extends Control
@onready var http_request = $Button/HTTPRequest
@onready var rich_text_label = $RichTextLabel

var url = "https://meowfacts.herokuapp.com/"

func _on_button_pressed():
	print('test')
The only thing left to do is make our actual request. We can do this by utilizing the http_request variable. It has a method called request, which we can pass our custom URL to as a parameter.
func _on_button_pressed():
	http_request.request(url)
Handling the HTTP response
We have completed sending the request, but we now need to tell our program what to do with the response. The first step of this is getting the HTTP response. We can once again do this using one of Godot’s built-in signals. This signal is for the HTTPRequest node, and is called “request_completed”.
It is widespread in this day and age for APIs to return a JSON string. This is also the case for my example. To properly handle this JSON string we need to do a few things. The string can be found inside of the “body” parameter of our new function “_on_http_request_request_completed”. we can get the string from it by using the method “get_string_from_utf8”. If we print using this method on the body and run it, we should get a string response as an output of our program.
func _on_http_request_request_completed(result, response_code, headers, body):
	print(body.get_string_from_utf8())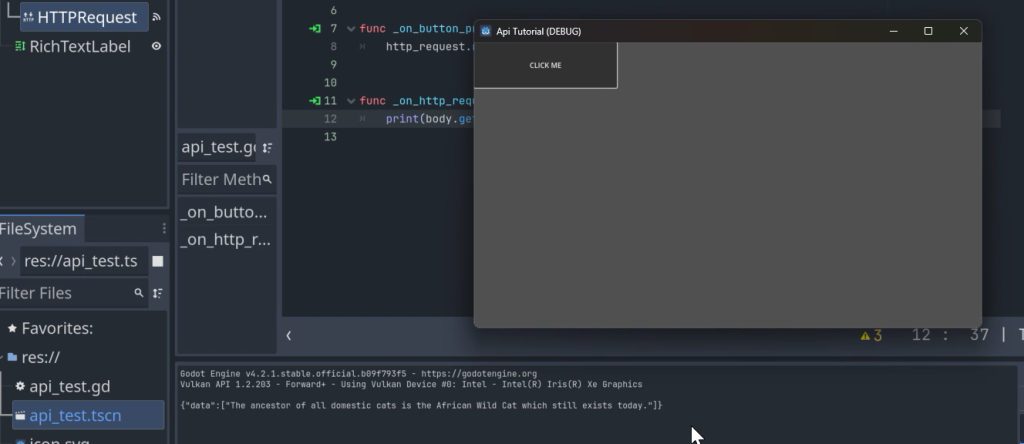
Since our response is in JSON format, we can modify the function using Godot’s built-in JSON parser. Let’s set the modified output to a new variable called data. My response’s data object is returning an array or 1. To just get the random string I am going to break this down by grabbing the first array item inside of the data object of my response. I will also be setting that equal to a variable.
func _on_http_request_request_completed(result, response_code, headers, body):
	var data = JSON.parse_string(body.get_string_from_utf8())
	var cat_fact = data.data[0]
Lastly, I want to output this string each time the button is clicked. I can do this by changing the text property of the rich text snippet variable and setting it equal to said string.
rich_text_label.text = cat_factNow, if we run the project, our rich text label should be firing with a different cat quote each time we click on our button.
The completed code is :
extends Control
@onready var http_request = $Button/HTTPRequest
@onready var rich_text_label = $RichTextLabel

var url = "https://meowfacts.herokuapp.com/"

func _on_button_pressed():
	http_request.request(url)


func _on_http_request_request_completed(result, response_code, headers, body):
	var data = JSON.parse_string(body.get_string_from_utf8())
	var cat_fact = data.data[0]
	rich_text_label.text = cat_fact
In conclusion, the integration of APIs within the Godot Game Engine opens up exciting possibilities for game developers to enhance the interactivity and versatility of their creations. By leveraging APIs, developers can dynamically fetch data from external sources, such as multiplayer profiles, assets, or AI services, enriching the gaming experience. Through the step-by-step guide provided in this article, we’ve shown you how to fetch data from an API within the Godot Engine. You can now continue to build off this concept and implement more advanced APIs into your games creating something truly dynamic and unique.


